
Can you preserve a fish to mount? Yes, you absolutely can preserve a fish to mount, a process known as fish taxidermy. This rewarding hobby or profession allows you to create a lasting display of a prized catch. Preserving fish skin correctly is crucial for a lifelike mount, and this guide will delve into various fish preservation methods and fish mounting techniques.
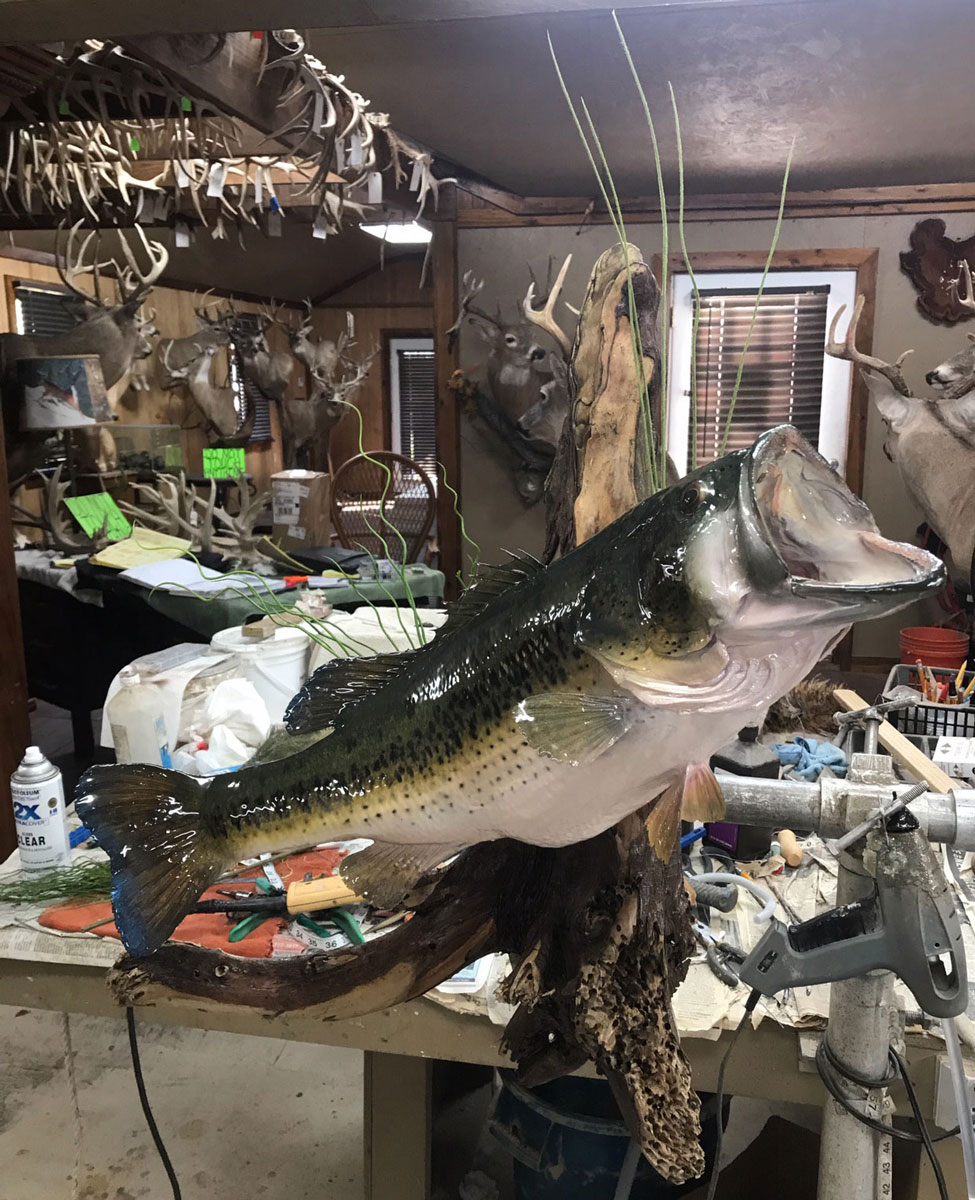
Image Source: www.louisianasportsman.com
Preparing Your Fish for Preservation: The First Crucial Steps
When you’ve landed that trophy fish, the immediate goal is to keep it in the best possible condition for mounting. This isn’t just about aesthetics; it’s about retaining the color, shape, and scale integrity that make a good mount great. Proper preparation from the moment of catch is paramount for successful fish specimen preservation.
Immediate Handling After the Catch
What you do in the first few minutes after catching your fish can make or break the final mount.
- Handle with Care: Avoid excessive squeezing or rough handling. Fingers can damage delicate scales and fins. If possible, wear gloves.
- Minimize Bleeding: If you intend to mount the fish, it’s best to dispatch it quickly and humanely. This helps preserve blood vessels and prevents spoilage.
- Avoid Ice Slurry Directly: While keeping the fish cool is vital, direct contact with ice can damage the skin and scales.
Cleaning and Documenting Your Fish
Once you have your fish ready for preservation, a thorough cleaning and detailed documentation are essential.
Cleaning Procedures
- Rinse Thoroughly: Use clean, fresh water to rinse away any dirt, slime, or blood. Pay close attention to the gills and mouth.
- Remove Internal Organs (Optional but Recommended): For long-term preservation, especially if you’re not mounting immediately, gutting the fish can prevent internal decay. Make a clean cut from the vent to the gill plate and carefully remove the entrails. Rinse the cavity thoroughly.
Documentation for a Realistic Mount
This step is critical for accurate color matching and detail reproduction, especially if you are preserving the skin to be mounted later.
- Take Detailed Photographs:
- Side Views: Capture clear shots of both sides of the fish.
- Top and Bottom Views: These are important for fin placement and body shape.
- Close-ups: Focus on fins, head details, and any unique markings.
- Color References: If possible, take photos in natural light. Some taxidermists also recommend taking reference photos next to a neutral color chart.
- Measure Accurately:
- Total Length: Measure from the tip of the snout to the end of the tail.
- Girth: Measure around the widest part of the body.
- Fin Measurements: Note the length and width of major fins.
- Record Color Notes: While photos are great, write down specific color details – the exact shade of red in the fins, the subtle iridescent blues, or the precise pattern of spots. Fish colors can fade quickly, so immediate notes are invaluable.
Storing the Fish Temporarily
If you cannot begin the preservation process immediately, proper temporary storage is key to preventing deterioration.
Refrigeration vs. Freezing
- Refrigeration: For short-term storage (a few days), wrapping the fish tightly in plastic wrap and then placing it in a sealed plastic bag in the refrigerator is a good option. Ensure it’s well-chilled but not frozen.
- Freezing: For longer-term storage, freezing is necessary.
- Wrap Tightly: Wrap the fish in plastic wrap, ensuring no air pockets.
- Double Bag: Place the plastic-wrapped fish into a heavy-duty freezer bag and remove as much air as possible before sealing.
- Label Clearly: Mark the bag with the species, date, and any other relevant information.
Fish Preservation Methods: From Skinning to Tanning
Preserving a fish for mounting involves several key stages. The primary goal is to remove the flesh and internal organs while maintaining the integrity of the skin, fins, and skeleton. Several fish preservation methods exist, each with its advantages.
Method 1: Preserving the Fish Skin (The Most Common Approach)
This is the most common method for fish taxidermy. It involves carefully skinning the fish, preserving the skin, and then rebuilding the fish form.
Skinning the Fish
This is a delicate process that requires precision.
- Initial Cut: Make a cut from the tail up along the ventral (belly) side to just behind the pectoral fins.
- Peeling the Skin: Carefully begin to peel the skin away from the flesh, working towards the head. Use a sharp knife or a blunt tool to gently separate the skin from the muscle.
- Fins and Gills: The pectoral and pelvic fins are usually attached to the skin. The dorsal and anal fins can be tricky. Some taxidermists skin around them, leaving the fin rays attached to the skin. Others may skin them separately. The gills are also removed at this stage.
- Head Area: The skin around the head is often the most challenging. Be patient and work slowly to avoid tearing. The mouth should be carefully opened, and any remaining tissue inside removed.
Preserving the Fish Skin
Once skinned, the skin needs immediate preservation to prevent spoilage.
- Salting: A common and effective method.
- Lay the skin flat, flesh-side up, in a non-metallic container.
- Cover the entire skin generously with granular salt (pickling salt is ideal).
- Allow the salt to draw out moisture for several days, draining and replacing the salt as needed.
- Freezing: If you’re not ready to salt or tan, the skinned fish can be frozen as described previously, but it’s best to proceed with preservation as soon as possible.
Tanning Fish Hides
Tanning is a chemical process that stabilizes the fish skin, making it durable and preventing decay. There are various tanning solutions available from taxidermy supply stores, or you can use homemade solutions.
- Commercial Tanning Solutions: Follow the manufacturer’s instructions carefully. These often involve soaking the salted skin in a solution for a specified time.
- Homemade Tan (Borax and Salt): A common, simpler method involves a mixture of borax and salt.
- Mix equal parts borax and salt.
- Pack the flesh side of the skin with this mixture.
- Allow it to cure for several weeks, replacing the mixture as it becomes wet.
- After curing, the skin should be flexible and no longer prone to rotting.
Method 2: Fish Casting (Creating a Replica)
Fish casting is an alternative to preserving the actual fish skin. This method involves creating a mold of the fish and then casting a replica, often made of resin or plaster. This is excellent for preserving the exact coloration and detail, especially for species with delicate fins or unique patterns that are hard to replicate with skin mounts.
Creating the Mold
- Positional Clay: Position the fish in a lifelike pose.
- Mold Material: Use a high-quality casting material, often a two-part silicone or rubber.
- Pouring the Mold: Carefully pour the mold material around the fish, ensuring all details are captured. Once cured, the mold can be separated.
Casting the Replica
- Casting Material: Mix resin or plaster according to product instructions.
- Pouring the Cast: Pour the casting material into the mold.
- Painting: Once the cast is cured, it’s painted to perfectly match the original fish’s coloration. This is where your reference photos and notes become invaluable.
Method 3: Preserving the Entire Fish (Less Common for Mounting)
While not typically used for detailed mounts, some methods preserve the entire fish, often for scientific study or display in a liquid medium.
Chemical Preservation
- Formalin or Alcohol: Immersing the fish in a formaldehyde or alcohol solution can preserve the entire specimen. However, this often causes colors to fade dramatically and the body to become rigid, making it unsuitable for a lifelike mount. This is more for anatomical preservation.
The Art of Fish Mounting Techniques
Once the fish skin is preserved and tanned, the next step is the actual mounting process. This is where the skill of the taxidermist truly shines.
Building the Form
Traditionally, a sculpted clay form or a pre-made foam or plaster form was used.
- Sculpting: The taxidermist would sculpt a clay body to match the fish’s measurements and shape.
- Pre-made Forms: Today, many taxidermists use pre-made polyurethane foam forms that can be carved and modified to fit the specific fish.
Applying the Skin
This is a crucial stage where the preserved skin is fitted onto the form.
- Soaking the Skin: The tanned skin is often rehydrated and softened in water, sometimes with a re-tanning solution.
- Applying Adhesive: A specialized taxidermy adhesive is applied to the form and the flesh side of the skin.
- Fitting and Shaping: The skin is carefully stretched and molded over the form, ensuring a snug fit. Special attention is paid to wrinkles and air pockets.
- Securing Fins: The delicate fins are carefully positioned and secured using pins, glue, or specialized fin supports. The tail fin is often a separate piece that needs to be attached.
Recreating Details
This is where the magic happens, bringing the fish back to life.
- Eyes: Glass or plastic eyes are inserted to match the original fish’s eye size, shape, and color.
- Mouth and Gill Plates: These are carefully positioned and secured, often with filler material.
- Scale Detail: The taxidermist works to ensure the scales lie flat and naturally. Sometimes, individual scales may need to be adjusted or replaced.
Finishing Touches
The final stages involve painting and sealing.
- Color Matching and Painting: Using the reference photographs and notes, the taxidermist meticulously paints the fish to restore its natural colors and patterns. Airbrushing is a common technique for achieving smooth, lifelike gradients.
- Sealing: A protective clear coat is applied to protect the paint and the skin from the environment.
- Mounting to a Base: The finished fish is typically mounted on a wooden plaque, driftwood, or a custom base for display.
Essential Taxidermy Supplies for Fish Preservation
To undertake fish taxidermy, you’ll need a specific set of tools and materials. Having the right taxidermy supplies is essential for a professional and lasting mount.
Tools
- Sharp Knives: For skinning and detailing.
- Scalpels: For precise cuts.
- Scissors: For trimming fins and tissue.
- Needle-Nose Pliers: For handling small parts.
- Measuring Tape: For accurate measurements.
- Camera: For reference photos.
- Gloves: To protect your hands and the fish.
- Buckets and Containers: For soaking, salting, and tanning solutions.
- Mixing Bowls and Stirring Sticks: For preparing solutions.
- Brushes: For applying adhesives and paint.
- Pins: For holding fins in place.
Materials
- Preservative Solutions: Salting agents, commercial tanning solutions, or borax/salt mixtures.
- Adhesives: Specialized taxidermy glues.
- Fish Forms: Pre-made foam forms or materials for sculpting.
- Eyes: Glass or plastic fish eyes.
- Finging/Repair Materials: Epoxy putty or filler for small repairs.
- Paints: Acrylic or oil-based paints suitable for taxidermy.
- Clear Coat/Varnish: For protection.
- Mounting Boards/Bases: Plaques or custom bases.
Frequently Asked Questions (FAQ)
How long does it take to preserve a fish?
The time varies depending on the method, the size of the fish, and your experience. Skinning, salting, and tanning can take several weeks. The actual mounting and painting process might take several days to a couple of weeks.
Can I preserve a fish with the scales on?
Yes, preserving the scales is a primary goal of fish taxidermy. Careful skinning and handling are crucial to keep them intact. Some methods, like casting, bypass the need to preserve the actual scales.
How do I keep the fins from curling?
This is a common challenge. After preserving and tanning, fins can be fragile. During the mounting process, they are often pinned in place while drying, sometimes with the help of reinforcing materials or drying racks.
What is the best way to preserve a fish that has been frozen for a long time?
If a fish has been frozen for a long time, thawing it slowly in the refrigerator is best. Inspect the skin carefully for any signs of freezer burn, which can affect the quality of the mount. If the skin appears damaged, casting might be a better alternative.
Are there any shortcuts for fish preservation?
While there are kits and simplified methods, shortcuts often compromise the quality and longevity of the mount. For a truly lifelike and durable fish display, following established preservation and mounting techniques is recommended.
Where can I find taxidermy supplies?
Taxidermy supply companies online and some local taxidermy shops are excellent sources for specialized taxidermy supplies.
Preserving a fish to mount is a detailed process that combines careful handling, chemical preservation, and artistic skill. Whether you choose to preserve the fish skin, create a cast, or explore other fish preservation methods, the key is meticulous attention to detail. By following these steps and utilizing the right taxidermy supplies, you can create a beautiful and lasting fish display of your treasured catch.