
Ever stared at a wall of colorful soft plastic lures in the tackle shop and wondered, “Could I make something just as good, maybe even better?” That feeling of wanting to customize your catch is strong! But then you start looking at lure-making kits, and suddenly, you face a confusing jungle of different plastics, colors, and molds. Which one is right for your fishing style? Does the cheapest kit actually work, or will you waste money on brittle plastic?
Finding the perfect Soft Plastic Lure Making Kit can feel like fishing in the dark. You worry about getting the wrong temperature for the plastic or choosing a mold that fish just ignore. It’s frustrating when you want to create custom baits but don’t know where to start without buying a dozen things you don’t need.
This guide cuts through the noise. We break down exactly what makes a great kit, what features matter most for beginners, and how to avoid common beginner mistakes. By the end of this post, you will know precisely which kit unlocks your inner lure designer and helps you land bigger fish with your own creations. Let’s dive into the exciting world of custom soft plastics!
Top Soft Plastic Lure Making Kit Recommendations

- Fun & Easy to Learn
- Saves you Money
- Great Gift Idea for Bass Fishermen
- Fun & Easy to Learn
- Saves you Money
- Great Gift Idea for Fishermen
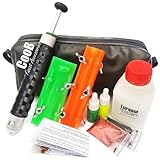
- Premium Soft Plastic Molds Lure Making Injection Molds Fishing Lures Starter Kit
- Please Note: Color of Molds may be different than on Photo. Two Plastic High Density Molds (Senko 5'' worm and Easy shiner 4'' shad)
- 45ml / 1.5 oz Aluminium Injector (with locking nozzle)
- 2 x 10ml bottles of Standard Liquid Colour (shartreuse)
- 1 bottle Luresol Medium 0.25L

- Fun & Easy to Learn
- Saves you Money
- Great Gift Idea for Bass Fishermen

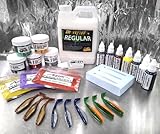
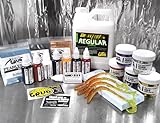
- 3 - CNC Machined High Density Resin Injection Molds ( 5" Worm, 3" Swim Bait, 2-1/2" Craw)
- FusionX Fishing 60 Degree Taper Stainless Steel Mold Injector
- 6 Colors of X-Cube Plastic Resin
- Instructions Included
- Mold Clamps NOT INCLUDED

- Excellent Clarity
- Non Yellowing / Scorching
- No Hard Pack
- Low Oder

- 32 FLUID OZ - MEDIUM HARDNESS CLEAR FOR MOST LURE APPLICATIONS
- COMPATIBLE WITH COMMON PIGMENTS, GLITTER, EFFECTS
- DE-GASSED TO REDUCE AIR BUBBLES FOR ULTRA-CLARITY
- NON-YELLOWING AND NO HARD PACKING
The Ultimate Buying Guide for Your Soft Plastic Lure Making Kit
Making your own soft plastic lures is a fun and rewarding hobby. You can create the exact colors and shapes that fish love in your local waters. This guide helps you pick the best kit to start your journey.
Key Features to Look For
When you shop for a soft plastic lure making kit, check these features first. They make the process easier and the results better.
1. Mold Quality and Variety
- Material: Look for molds made of sturdy aluminum or high-quality, heat-resistant silicone. Metal molds last longer.
- Bait Shapes: A good starter kit offers a few popular shapes, like grubs, swimbaits, or creature baits. More variety lets you test different fishing styles.
2. Plastic Quality and Quantity
- Plastic Type: Kits should use high-quality, soft PVC plastic pellets or liquid plastic. This plastic needs to be easy to melt and pour.
- Color Options: Ensure the kit includes several different colors of plastic concentrate or liquid dye. Bright colors are often needed for clear water fishing.
3. Safety and Ease of Use
- Heating Tools: Check if the kit includes a safe heating pot or injector system. Safety features, like automatic shut-off, are very important.
- Instructions: Clear, step-by-step instructions help beginners avoid mistakes. Pictures or videos are a big plus.
Important Materials in Your Kit
A complete kit provides everything you need to start pouring right away. Do not buy a kit missing these core components.
The Essential Ingredients
- Liquid Plastic Base: This is the main ingredient that forms your lure.
- Liquid Softener (Plasticizer): This material makes the finished lure flexible, which fish prefer.
- Colorants and Glitters: These give your lures their appeal. Look for concentrated liquid or powder dyes.
- Molds: As mentioned, these define the shape of your finished bait.
- Pouring Equipment: This usually means a pouring pot, stir sticks, and measuring cups.
Factors That Affect Lure Quality
The final look and action of your lure depend on a few key factors you control during the process.
Improving Quality
- Accurate Temperature Control: If the plastic is too hot, it burns and smells bad. If it is too cool, it does not fill the mold properly. Precision matters.
- Proper Mixing: Mix your colorants and glitters thoroughly into the base plastic. Uneven mixing leads to splotchy lures.
Reducing Quality (What to Avoid)
- Using Old Plastic: Plastic that has been sitting out or exposed to air too long might cure poorly or shrink too much.
- Ignoring Curing Time: Rushing the cooling process in the mold causes soft spots or misshapen lures. Let them set completely.
User Experience and Use Cases
Think about how you plan to use your new kit. This helps you choose the right size and style.
Beginner vs. Expert Kits
Beginner kits usually have smaller batches and simpler one-piece molds. They let you learn the basics without a big investment. Expert kits offer larger volume pouring, multiple mold cavities, and advanced injection systems for higher output.
When to Use Homemade Lures
- Testing New Spots: You can quickly make small batches of hyper-specific colors for a new lake or river.
- Cost Savings: Over time, making your own lures saves money, especially if you lose many baits!
- Custom Action: By adjusting the plasticizer, you can make super-soft lures for slow retrieves or stiffer ones for faster trolling.
Frequently Asked Questions (FAQ)
Q: Is soft plastic lure making safe for kids?
A: Adult supervision is always needed. Melting plastic involves high heat, and some plastic fumes can be harmful if inhaled in large amounts. Good ventilation is a must.
Q: How long does it take to make one batch of lures?
A: A simple batch, from melting to demolding, usually takes about 30 to 45 minutes, depending on how fast your materials cool down.
Q: Do I need a special room to do this?
A: You need a well-ventilated space. An open garage or a workshop with an exhaust fan works best. Do not use an enclosed kitchen space for melting plastics.
Q: Can I use craft glitter in my lures?
A: It is best to use glitter specifically made for soft plastics. Craft glitter often does not handle the high melting temperatures well and can bleed color.
Q: What is the most important tool to buy separately?
A: A high-quality digital thermometer is very helpful. It lets you monitor the plastic temperature precisely, which is key to great results.
Q: How should I store leftover plastic?
A: Store your liquid plastic base in airtight containers away from direct sunlight and heat. This keeps it fresh for your next pouring session.
Q: Why are my lures sticky after they cool?
A: Stickiness usually means you used too much plasticizer (the softening agent). You need to balance the softener with the base plastic.
Q: Can I reuse the plastic if I mess up a pour?
A: Yes! Most soft plastic bases can be melted down and remixed with new colorants. This reduces waste, which is great.
Q: What is the difference between liquid plastic and plastic pellets?
A: Pellets are solid beads you melt down. Liquid plastic is pre-mixed and easier for beginners because it requires less heating time and less precise measuring.
Q: How do I make my lures smell attractive to fish?
A: Many kits include scent additives. You mix these attractants into the hot plastic right before you pour them into the molds.