
Does the sight of tangled wires behind your entertainment center make you cringe? You’re not alone! That mess of cables can turn a sleek setup into an eyesore and even make troubleshooting a nightmare. Finding the perfect In Wall Cable Management Kit feels like another chore, right? You want neatness, safety, and a system that actually works for your specific needs, but the choices can be overwhelming.
Choosing the wrong kit can lead to frustration, wasted money, and walls that are harder to work with later. It’s a decision that impacts the look and function of your home theater or office for years to come. But don’t worry! This guide cuts through the confusion. We will break down exactly what you need to look for in an In Wall Cable Management Kit.
By the end of this post, you will know the key features that matter most, understand the installation process, and feel confident choosing the best solution to finally conquer that cable clutter. Get ready to transform your wall from messy to magnificent!
Top In Wall Cable Management Kit Recommendations

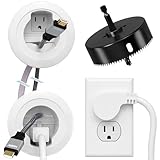
- Organized home theater setup – Eliminate messy wires and give your entertainment area a clean, modern look. This in-wall cable management kit provides an easy way to power your TV and hide cables for a polished setup in living rooms, bedrooms, or home theaters.
- Flexible Cable Concealment – Designed with a spacious recessed opening, this kit accommodates multiple HDMI, Ethernet, and A/V cables, allowing you to easily connect your devices while keeping everything neatly concealed behind the wall.
- Easy DIY installation – Designed for renters and homeowners who want the look of a pro install without hiring an electrician. This is a plug-in system (not hard-wired) and includes a drywall saw, and cutting template with step-by-step instructions for a simple setup in under 30 minutes.
- Safe and efficient cable management – ETL In-Wall Certified for safety. Power cord connects to your existing outlet, while low-voltage cables like HDMI and Ethernet can run safely behind the wall, protecting your devices and maintaining a sleek look.
- Built to last and Certified – Durable materials and ETL certification ensure long-term performance, giving you peace of mind that your home theater setup will remain safe and reliable.
- Hide Every TV Cable for a Clean Look: Eliminate messy wires from sight. This in-wall cable management kit hides all your TV power and AV cables, giving your living room a sleek, organized appearance.
- 【Before Purchase】 : Please confirm your wall has a minimum cavity depth of 3", and that your TV plug width does not exceed 1.125". Installation requires drilling two 3" holes (hole saw included).
- Easy DIY Installation in Just 30 Minutes: Only two holes to drill, no need to buy extra tools. The kit includes a 3" hole saw drill attachment and clear step-by-step instructions, making it easy to route and connect your cables with just a standard drill.
- Flexible Layout with 5ft Vertical Range & 6ft Cord Reach: Top and bottom modules can be installed up to 5ft apart. Plus, a 6ft extension cord lets you plug into outlets without exposed wires.
- Flexible Layout with 5ft Vertical Range & 6ft Cord Reach: Top and bottom modules can be installed up to 5ft apart. Plus, a 6ft extension cord lets you plug into outlets without exposed wires.

- Route power and AV cables behind the wall in just 30 minutes with this easy DIY kit. All you need is a drill and maybe a post-installation beer.
- Pre-wired and ETL In-Wall Certified, this kit keeps your home safe and up to code—because “oops” isn’t a great look when dealing with electricity.
- Install power modules up to 5’ apart so power lands exactly where you want it. Just make sure to keep them in the same stud bay.
- The cable pass-through fits up to 4 large braided HDMI cables with room to spare for Ethernet and audio cords. Flexible enough for any setup.
- Includes a drywall hole saw for a perfect fit and locking wings that securely attach behind the wall. Just make sure there’s at least 2.5” of space behind your drywall for proper installation.

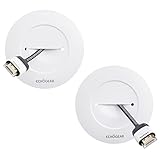
- In wall cable management kit, perfect for keeping your flat panel TVs, gaming systems, and entertainment consoles organized and tidy.
- Designed for perforated walls with a thickness of 12mm-18mm, such as plaster or wood plank walls, this tv cable hider wall kit seamlessly blends into your home or office decor.
- Our cord hider intimate design features thicker hole sawing and drilling accessories, ensuring a perfect grommet fit and making installation quick and easy.
- Say goodbye to messy wires and cluttered spaces - with our tv wire hider kit for wall mount tv, you can transform your living space into a clean and organized haven.
- We stand behind our product with high-quality after-sales service, including guaranteed defect reissuance and professional customer support available 24/7.

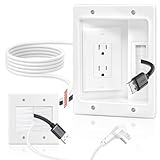
- 【Complete Concealment】Professionally Hide TV Power Cords, Speaker Wires, And All AV Cables to Eliminate Clutter. Seamless Built-in Design Not Only Enhances Your Space Aesthetics But Also Prevents Access By Children and Pets.Includes: 1 * 2 AC Wall Power Outlets with 9.8FT Power Cord.1 * Brush Wall Plate.1 * Dry Wall Saw.1* Manual (Cutting Template).
- 【Flexible Setup】9.8ft Extended Power Cord Allows Optimal Placement of TVs and Speakers. Hidden Channels Keep Multiple Cords Organized and Out of Sight.
- 【Safety & Durability 】UL-Certified Components & ETL-Certified Wiring. Fire-Resistant Materials With Tamper-Resistant (TR) Outlets and Safety Shutters—Ideal for Families with Kids and Pets.
- 【Pro-Grade Power】125V/15A Output Supporting up to 1875w Max. The Unique 45° Flat Plug is the Design Highlight - At Just 0.28" Thick, It Sits Completely Flush Against the Wall, Solving the Problem of Bulky Right-Angle Plugs That Protrude and Block Adjacent Outlets, Enabling Truly Hidden Installation and Unobstructed Use of Both Outlets.
- 【Quick Installation】Just Cut Two Standard Holes in The Wall—No Complicated Wiring. Please Verify Wall Cavity Depth ≥3.74 Inches Before Installation.Complete Your Installation in Just 30 Minutes!
- Hide your cables behind the wall with this DIY cable pass-through kit. Just add a drill and you've got everything you need for a quick 20-minute install. You'll only need to skip 1 episode of The Office.
- Perfect for hiding HDMI, Aux, and other low-voltage cables. Also works for in-wall rated power cables. Just make sure your dog hasn't been chewing on them first.
- Includes a drywall hole saw drill attachment for a perfect grommet fit. The grommets even lock onto the back of your drywall for a secure install. Saw attachment also useful in the event of a zombie apocalypse.
- Flexible pass through grommets can comfortably fit 4 large HDMI cables. There's plenty of room for even your thickest cords.
- Feeling artsy? These grommets are paintable for maximum concealment. Bob Ross would be proud. We're also helping the planet by planting a tree for every unit sold!
- 【All-In-One in wall Cable Management 】(Updated Version Cool White) Our in wall cable management kit can eliminate messy wires! Designed specifically for wall-mounted TVS and entertainment systems, it can hide messy power cords, HDMI cables, Ethernet cables and audio/video cables within the wall, creating a neat and professional layout and providing you with a clean and comfortable living space
- 【Easy to install】We have detailed installation step-by-step diagrams. With basic tools, the installation can be completed in just 30 minutes - no electrician required! The wing-shaped clips ensure a tight bond with the gypsum board,Conference Rooms, or Smart Home Devices.Confirm size pre-purchase. Requires sufficient wall depth for recessed outlet installation. extra tools (like fish tape or wire snake) may be needed to guide cables through
- 【Sleek & Appearance for ALL】Adopts a stylish and simple white appearance design, suitable for various styles of home decoration. It is a common all-style matching color, no matter which style you choose for your home, boardroom, office, and any residential and commercial space. It will be your best choice!
- 【Safe and Durable】9ft power cord with 15A/125V dual sockets to ensure the safety of power wiring inside the wall.made of flame-retardant PC durable material that is resistant to bending/cracking, preventing potential damage to the cable, long-term reliability
- 【Space-Saving &】This 6.10"L x7.87"H x 3.74"D,in wall cable management kit Slim Profile Lets Tvs/A/V Equipment Sit Flush Against Walls powers your TV and hides low voltage cables safely behind the wall
- In Wall Cable Management: With VCE cable wall plates, you can quickly and easily run the cables through the wall without making a mess
- Cable Hider for Wall Mount TV: Perfect for HDMI cables, coaxial cables, standard A/V cables, speaker wires, network RJ45 cables, and other low-voltage cables
- High Quality Materials: Made of reliable, durable, and flame-retardant ABS materials to ensure safety using for you
- Easy to Install: installation can be finished in a few minutes. You just need to insert the brush into the outer casing and place on the wall (Package includes mounting screws)
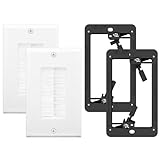
- Package Contents: 2 x Brush Wall Plate Cord Pass Through + 2 x Low Voltage Mounting Bracket; 18 months product care period for quality problems
Your Guide to Taming the Wires: Choosing the Best In-Wall Cable Management Kit
Tangled wires look messy. They also collect dust. An in-wall cable management kit hides those ugly cables neatly. This guide helps you pick the right kit for your home theater or office setup.
Key Features to Look For
A good kit makes installation easy and keeps wires safe. Look for these main features:
- Brush or Grommet Plates: These are the openings you install in the wall. Brush plates let cables pass through while stopping air and dust from moving between rooms. Grommet plates offer a cleaner, solid look.
- Cable Sleeves or Raceways: These are tubes or flexible covers that hold bundles of wires together inside the wall. They protect cables from being pinched or damaged.
- Low-Voltage Mounting Brackets: Always choose kits with brackets designed for low-voltage cables (like HDMI, Ethernet, and speaker wires). These brackets secure the openings to the wall studs.
- Expansion or Adjustable Features: Some kits let you add more cables later. Check if the sleeves or plates can expand.
Important Materials
The material of your kit affects its look and how long it lasts.
Most quality kits use durable plastics like **PVC** or **ABS plastic**. These materials resist heat and are safe for electrical wiring (low-voltage only). Metal clips or brackets offer extra strength when securing the plate to the wall stud.
Avoid very thin or brittle plastic. Thin plastic cracks easily during installation or when you push cables through it.
Factors That Improve or Reduce Quality
Good design makes a big difference in the final result.
What Makes a Kit High Quality?
- Easy Installation: The parts should fit together smoothly. Clear instructions are vital. Quality kits often include template stickers to help you cut the drywall perfectly.
- Secure Fit: The mounting brackets must hold the plates firmly against the drywall. There should be no gaps where the plate meets the wall surface.
- Heat Resistance: While these kits handle low-voltage wires, good plastic resists minor heat buildup better.
What Lowers the Quality?
Cheap kits often have sharp edges on the plastic openings. These sharp edges can scrape the insulation off your cables over time, causing signal loss or damage. Also, if the screws are poor quality, they might strip easily when you try to mount the plate.
User Experience and Use Cases
Think about where you plan to use the kit.
Home Theater Setup: If you run wires from a TV down to a soundbar or media console, you need a kit that handles many thick cables (like HDMI and power cords—though power cords usually need special consideration or placement). A long cable sleeve running straight down the wall works best here.
Office/Desk Area: For computer setups, you might need two separate openings—one high up near the monitor and one lower near the PC tower. Brush plates are often preferred here because they look neat while allowing frequent connection changes.
Installation Difficulty: If you are new to DIY, look for kits that require minimal cutting. Some systems snap together without needing complex cutting tools. Always measure twice before you cut into your drywall!
10 Frequently Asked Questions (FAQ) About In-Wall Cable Management Kits
Q: Can I run power cords (AC power) in the same opening as my HDMI cables?
A: No, you should never run high-voltage power cords (like the ones plugged into the wall outlet) and low-voltage data cables (like HDMI or Ethernet) together in the same conduit or opening. This can cause electrical interference or pose a safety risk. Check local building codes.
Q: Do these kits require me to cut a hole in the drywall?
A: Yes, most kits require you to cut a hole for the mounting bracket or faceplate. Quality kits include a cardboard template to trace the exact shape you need to cut.
Q: Are these kits safe for speaker wires?
A: Yes, speaker wires are low-voltage and are perfectly safe to run through these management kits.
Q: How many cables can a standard kit hold?
A: This varies widely. A standard single-gang brush plate might hold 4 to 6 thin cables. Larger raceways or dual-gang plates can hold many more, perhaps 10 to 15 bundled wires.
Q: Do I need a professional electrician to install this?
A: If you are only installing low-voltage cable pass-throughs, most homeowners can do it themselves. If you plan to route or install in-wall power outlets, hire an electrician.
Q: What is the difference between a brush plate and a grommet plate?
A: A brush plate uses flexible bristles to block air flow while allowing cables to pass. A grommet plate uses a solid plastic ring that the cables pass through, offering a cleaner, more finished look.
Q: Can I use these kits if my wall has insulation?
A: Yes, but you must ensure the cables pass completely through the wall cavity and into the space above or below the insulation, depending on your setup. The brackets help secure the opening regardless of the insulation behind it.
Q: Will this damage my existing drywall?
A: If you use the template provided and cut carefully, it will only create a neat, rectangular hole that the faceplate covers perfectly. Poor cutting leads to visible damage.
Q: Are the plastic parts fire-rated?
A: Most standard, low-voltage kits are plastic and are not fire-rated. If you need to pass cables through a fire-rated barrier (like between floors or apartments), you must use special fire-stop putty or sleeves, which are separate purchases.
Q: How do I feed the cables through the wall once the bracket is installed?
A: Use a fish tape (a flexible wire tool) or a stiff piece of string. Tape the end of your cable to the string and gently pull it through the wall cavity from the top opening to the bottom opening.