
Can you preserve fish for taxidermy? Yes, absolutely! Preserving fish for taxidermy is a rewarding process that captures the beauty of your catch. This guide will walk you through the essential steps and different techniques involved in successful fish preservation for taxidermy.
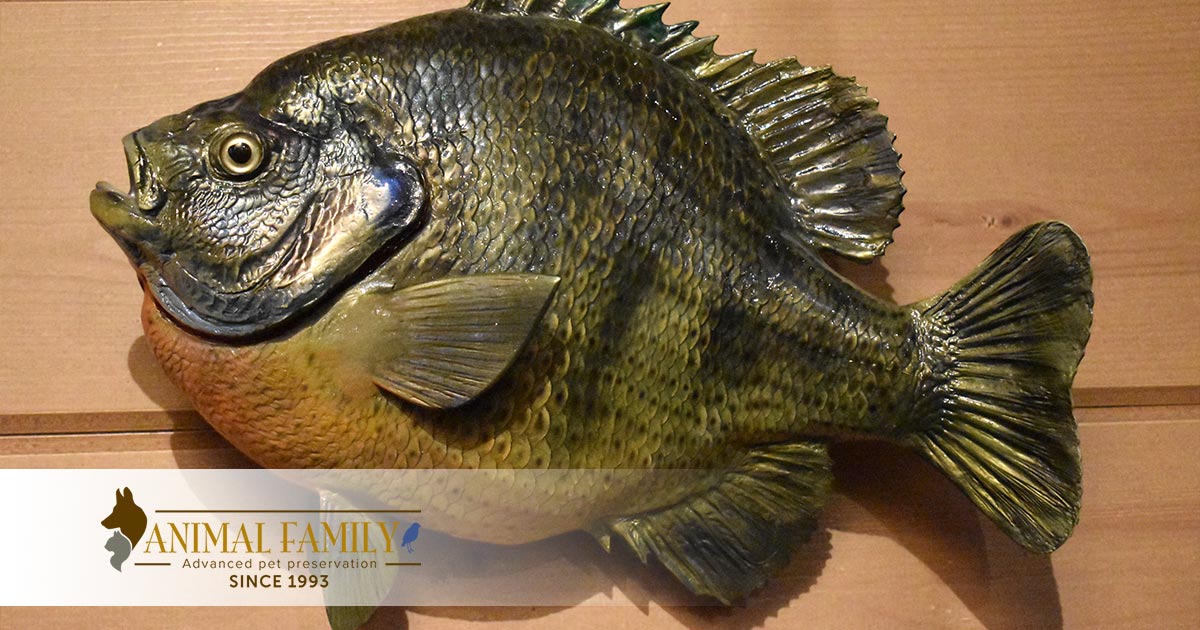
Image Source: animalfamilypet.com
Deciphering Fish Preservation Methods
Preserving fish for taxidermy involves several key techniques, each with its own advantages and suitability depending on the fish species and desired outcome. Choosing the right preservation method is crucial for ensuring the longevity and aesthetic appeal of your finished mount. Let’s explore the most common and effective fish preservation methods.
Taxidermy Fish Preparation: The Crucial First Steps
Before diving into preservation, proper preparation is paramount. This stage sets the foundation for a successful mount and prevents common issues like tissue rot and color loss. Gathering the right tools and understanding the anatomy of the fish are vital.
Essential Tools for Fish Preparation:
- Sharp Knives: A variety of sharp, flexible fillet knives are essential for skinning and detailed work.
- Scalpel: For fine details and precise cuts.
- Heavy-Duty Scissors: For cutting fins and other tougher materials.
- Tweezers: For removing small bones, blood clots, and other debris.
- Gloves: To protect your hands and keep the fish clean.
- Buckets or Trays: For holding the fish and preserving solutions.
- Measuring Tape: For accurate record-keeping.
- Camera: To document the fish’s original coloration and features.
- Reference Photos: Taking detailed photos from multiple angles before preservation is crucial for accurate painting later.
Initial Handling of the Fish:
The moment a fish is caught, its clock starts ticking. Quick and careful handling is key to preserving its vibrant colors and natural form.
- Measure and Photograph Immediately: Record the fish’s length and girth. Take clear, well-lit photos from all sides, focusing on any unique markings, color patterns, and fin shapes.
- Remove Excess Slime: Gently wipe off as much slime as possible with a soft cloth or paper towels. Slime can interfere with preservation and introduce bacteria.
- Keep it Cool: The cooler the fish stays, the slower decomposition will occur. If you can’t preserve it immediately, keep it in a cooler with ice (ensure the ice doesn’t melt directly into the fish, which can cause waterlogging).
Skinning Fish for Taxidermy: Revealing the Beauty Within
Skinning is a critical step that separates the desired skin from the fleshy body. A clean, meticulous skinning process makes the subsequent preservation and mounting much easier and yields a better result.
The Skinning Process:
- Placement: Lay the fish on a clean, flat surface, preferably on its side with its back towards you.
- Initial Incision: Make a shallow incision along the dorsal fin, from the head towards the tail. Be careful not to cut too deep, as you want to avoid damaging the skin.
- Head Separation: Carefully cut around the head, just behind the gills. You’ll need to sever the spinal cord at the base of the skull.
- Peeling the Skin: Work your knife along the body, carefully separating the skin from the flesh. The skin should peel away relatively easily, especially with fresh fish. Use tweezers to help lift and separate areas where the skin might stick.
- Fin Removal: As you skin, you will encounter fins. You can either skin them separately or carefully cut them away, leaving a small portion of flesh attached for later reattachment. Some taxidermists prefer to skin the fins as extensions of the main body skin.
- Tail and Fins: Continue skinning towards the tail, carefully working around the fins. You may need to use scissors to cut through fin rays.
- Body Cavity: Once the skin is removed, you’ll have the fish’s body cavity. Ensure all remaining flesh, bone, and internal organs are completely removed from the inside of the skin. Thorough cleaning is essential.
- Fin Base Prep: For larger fins, you might need to carefully scrape away any remaining flesh or connective tissue at the base of the fin rays.
Cleaning the Skin:
After skinning, the skin needs a thorough cleaning to remove any residual blood, fat, and tissue.
- Rinse: Rinse the skin thoroughly with cold water.
- Scrape and Peel: Use a blunt knife or a spoon to gently scrape away any remaining fat or meat from the flesh side of the skin. Be gentle to avoid puncturing or tearing the delicate skin.
- Blood Removal: Pay close attention to removing all blood clots, especially in the gill areas and along the lateral line. Blood can cause staining and decay.
Salting Fish for Taxidermy: A Traditional Approach
Salting is one of the oldest and most reliable fish preservation methods. It draws out moisture and acts as a preservative, preventing bacterial growth.
The Salting Process:
- Materials: You will need a generous amount of non-iodized salt (kosher salt or pickling salt is ideal) and a container that can hold the fish without it being too tightly packed.
- Packing: Lay the cleaned fish skin flat in the container, flesh-side up. Cover the entire skin, including the fins and tail, generously with salt. Ensure there are no gaps where the salt is not in contact with the skin.
- Layering: If preserving multiple fish, you can layer them, ensuring each fish is completely covered in salt.
- Drainage: Place the container in a cool, dry place. The salt will begin to draw moisture out of the skin, creating a brine. Ensure the container has a way to drain this brine, or periodically empty and re-salt the fish.
- Duration: The salting process typically takes several weeks, depending on the size and thickness of the fish. You will notice the skin becoming firmer and drier as the process progresses.
- Re-salting: It’s often beneficial to change the salt every few days for the first week or two, especially if a lot of moisture is being drawn out.
- Washing: Once the fish skin feels firm and dry, it needs to be thoroughly washed to remove all residual salt. Rinse it multiple times in cold water.
- Drying: After washing, gently squeeze out excess water and allow the skin to air dry in a well-ventilated area, away from direct sunlight.
Table 1: Pros and Cons of Salting Fish for Taxidermy
| Pros | Cons |
|---|---|
| Highly effective at preventing decay | Can alter coloration if not done carefully |
| Relatively simple and inexpensive | Requires a significant amount of salt |
| Draws out moisture effectively | Can make the skin stiff if over-processed |
| Good for long-term storage before use | Time-consuming process |
| Minimal risk of freezer burn issues | May require re-hydration for some mounts |
Freezing Fish for Taxidermy: A Quick and Effective Method
Freezing is an excellent method for immediate preservation, especially if you cannot begin the taxidermy process right away. It halts bacterial activity and preserves the fish’s appearance.
The Freezing Process:
- Preparation: Ensure the fish is as clean as possible, with all blood and slime removed. Pat it dry thoroughly.
- Wrapping: Wrap the fish tightly in plastic wrap, ensuring no air can get to it. You may want to double or triple wrap it.
- Vacuum Sealing: For the best results, use a vacuum sealer to remove all air before freezing. This further prevents freezer burn and degradation.
- Freezer Bag: Place the wrapped fish into a heavy-duty freezer bag and seal it securely.
- Labeling: Label the bag with the species, date, and any other relevant information.
- Freezing: Place the bag in the coldest part of your freezer.
Important Note: When you are ready to taxidermy a frozen fish, it’s best to thaw it slowly in the refrigerator to minimize any damage to the skin or colors.
Chemical Preservation for Fish Taxidermy: Advanced Techniques
Chemical preservation offers a more permanent solution and is often used by professional taxidermists. These methods involve solutions that stabilize the tissue and prevent decay.
Borax and Salt Mixture:
A common and effective chemical preservative is a mixture of borax and salt.
- Ratio: A typical ratio is 50% borax and 50% salt.
- Application: After skinning and thoroughly cleaning the fish skin, liberally pack the flesh side of the skin with the borax/salt mixture. Ensure all areas, especially fins and the mouth, are well-covered.
- Placement: Place the treated skin in a box or container, flesh-side up, and cover it completely with the mixture.
- Drying: Leave the fish in a cool, dry place for several weeks. The mixture will draw out moisture and preserve the skin.
- Cleaning: Once dry, brush off the excess mixture. The skin is now ready for further preparation or mounting.
Formalin (Formaldehyde):
Formalin is a potent preservative but requires careful handling due to its toxicity. It’s generally used for soaking fish intended for certain types of mounts or for smaller specimens.
- Dilution: Formalin is typically used in a diluted form (e.g., 5-10% solution).
- Soaking: The fish or skin is submerged in the formalin solution for a specific period, which varies depending on the size and species.
- Ventilation: This process must be done in a very well-ventilated area or outdoors, as formalin fumes are hazardous.
- Neutralization: After preservation, the specimen may need to be neutralized.
Safety First with Chemicals: Always wear appropriate personal protective equipment (PPE) when working with chemical preservatives, including gloves, eye protection, and a respirator. Work in a well-ventilated area.
Drying Fish for Taxidermy: The Final Stage of Preservation
After salting or chemical treatment, the fish skin needs to dry thoroughly before mounting.
Air Drying:
- Location: Choose a dry, well-ventilated area away from direct sunlight and insects.
- Positioning: You can hang the fish skin or lay it flat on a mesh screen to allow air circulation on all sides.
- Patience: Drying can take several days to weeks, depending on humidity and the size of the fish. The skin should feel dry and leathery to the touch.
Drying Forms:
For some species or specific poses, drying forms can be used. These are lightweight forms that the skin is stretched and mounted onto.
Marinating Fish for Taxidermy: Enhancing Preservation and Flexibility
While not a primary preservation method on its own, a “marinade” can be beneficial as a secondary treatment, especially after salting or before final drying, to rehydrate and condition the skin.
- Solution: A common mixture includes glycerin, a little water, and potentially a mild fungicide or insecticide.
- Purpose: Glycerin helps to keep the skin supple and prevent it from becoming overly brittle.
- Soaking: The cleaned and partially dried skin is soaked in this solution for a period, then removed and allowed to finish drying. This is often referred to as “tanning” or “glazing.”
Creating Fish Molds for Taxidermy: Replicating Nature’s Perfection
For taxidermists who want to create exact replicas of a fish, creating molds is an invaluable technique. This allows for multiple copies or the creation of a form from a fish that might be too deteriorated for traditional taxidermy.
The Molding Process:
- Fish Preparation: The fish (either fresh, preserved, or even a cast) needs to be prepared. For fresh fish, it’s often lightly coated with a mold release agent.
- Mold Box: A box or container is created to hold the fish and the molding material.
- Molding Material: Silicone rubber is the most common material used for creating flexible, detailed molds. It captures even the finest scale detail.
- Application: The silicone is mixed and poured over the fish, ensuring it’s completely covered. Often, a two-part mold is made to capture both sides of the fish.
- Curing: The silicone is allowed to cure according to the manufacturer’s instructions.
- Demolding: Once cured, the silicone mold is carefully peeled away from the fish, revealing a detailed negative impression.
- Casting: This mold can then be used to cast replicas using materials like fiberglass, resin, or urethane foam. These casts are then painted to match the original fish.
Table 2: Comparison of Fish Preservation Methods
| Method | Primary Purpose | Best For | Considerations |
|---|---|---|---|
| Freezing | Immediate Halt to Decay | Freshly caught fish, short-term storage | Risk of freezer burn if not sealed properly |
| Salting | Drying & Bacterial Control | Most fish species, long-term storage | Time-consuming, can alter color if not washed thoroughly |
| Borax/Salt Mix | Drying & Preventative | Many fish, good general preservative | Can make skin brittle if over-dried, needs thorough brushing |
| Formalin | Tissue Stabilization | Specimens for specific mounts, small fish | Toxic, requires ventilation, careful handling |
| Glycerin Treat. | Skin Conditioning | Post-preservation treatment | Enhances flexibility, prevents brittleness |
| Molding/Casting | Replication | Detailed copies, difficult specimens | Requires specialized materials and techniques |
Mounting Fish for Taxidermy: Bringing the Fish to Life
Once the fish is preserved and its skin is prepared, the next step is mounting. This involves recreating the fish’s natural shape and pose.
Creating a Form:
Historically, fish were mounted on wooden or wire forms. Today, advancements allow for more realistic forms.
- Traditional Methods: Using filler materials like excelsior, plaster, and cotton to build up the body around a wire armature.
- Manikins: Pre-made fish forms (manikins) made of polyurethane foam are widely available and are a popular choice for their ease of use and accuracy. These can be altered to fit the specific dimensions of the preserved skin.
Skinning and Fitting:
- Fitting the Skin: The preserved fish skin is carefully fitted over the chosen form. Adjustments are made to ensure a snug and natural fit.
- Attaching Fins: Fins are often a challenge. They can be attached using adhesives, small pins, or by integrating them with the form during the mounting process.
- Eyes: Glass eyes are inserted into the eye sockets, chosen to match the species and size of the fish.
- Detailing: The mouth is sewn shut or held open as desired. Gill covers are positioned. Any remaining fins are posed and secured.
Finishing Touches:
- Sealing: The skin is sealed to protect it from moisture and insects.
- Painting: This is a crucial step where the taxidermist uses reference photos to recreate the fish’s original coloration. Airbrushing and hand-painting techniques are used to achieve lifelike hues.
- Finishing Clear Coats: A protective clear coat is applied to give the fish a natural sheen and protect the paintwork.
Frequently Asked Questions About Fish Taxidermy Preservation
Q1: What is the best way to preserve fish for taxidermy?
The “best” way depends on your resources and the specific fish. Freezing is excellent for immediate preservation. Salting is a classic, effective method for longer-term preservation. Chemical preservation like borax/salt mixtures offers good results with fewer risks than formalin.
Q2: Can I taxidermy a fish immediately after catching it?
Yes, ideally, you want to begin the preservation process as soon as possible after catching the fish to maintain the best color and detail.
Q3: How long does it take to salt a fish for taxidermy?
The salting process typically takes several weeks, with the exact duration depending on the size of the fish and the effectiveness of the salt in drawing out moisture.
Q4: What is the most common mistake people make when preserving fish for taxidermy?
Common mistakes include not cleaning the fish thoroughly enough (leaving blood or slime), not drying the fish properly after preservation, and damaging the skin during the skinning process.
Q5: How do I store a preserved fish skin before mounting?
Once properly preserved (e.g., salted and dried, or treated with borax/salt), fish skins can be stored in a cool, dry place. Some taxidermists will further treat them with a tanning solution or freeze them for long-term storage.
Q6: Is it possible to taxidermy a fish that has been frozen for a long time?
Yes, as long as the fish was properly wrapped and sealed to prevent freezer burn, it can generally be taxidermied after a long period in the freezer. Thawing it slowly in the refrigerator is recommended.
Q7: What is the difference between preserving for consumption and preserving for taxidermy?
Preservation for consumption focuses on preventing spoilage for eating and often involves cooking or canning. Preservation for taxidermy focuses on preventing decay while maintaining the fish’s external appearance (color, shape, fins) for display.
Q8: Can I use a whole fish for taxidermy, or do I always need to skin it?
While skinning is the most common method for creating lifelike mounts, some preservation techniques, like freeze-drying or certain forms of skin-mount taxidermy, may involve preserving the whole fish in a modified state. However, for traditional mounts, skinning is standard.
By following these detailed steps and choosing the appropriate methods, you can successfully preserve your fish for taxidermy, creating a lasting tribute to your angling achievements.