
Can I install a fish finder myself? Yes, you absolutely can install a fish finder yourself with a bit of preparation and careful execution. This guide will walk you through the entire process, from choosing the right spot to powering up your new device, making sonar installation a breeze. We’ll cover everything you need to know for a successful fish finder transducer installation, ensuring you get the most out of your electronics.
Image Source: www.boatus.com
Getting Started: What You’ll Need
Before you even think about drilling holes, gather all your tools and components. A smooth installation depends on having everything ready.
Essential Tools and Materials
- Fish Finder Unit: The main display and control unit.
- Fish Finder Transducer: This is the part that “sees” underwater.
- Transducer Mount: This secures the transducer to your boat. We’ll discuss different types, like transom mount transducer installation and through-hull transducer installation.
- Fish Finder Power Cable: Connects the unit to your boat’s electrical system.
- Mounting Hardware: Screws, bolts, nuts, and washers appropriate for marine use (stainless steel is best).
- Wire Strippers and Crimpers: For connecting wires.
- Wire Connectors: Heat-shrink connectors are recommended for a watertight seal.
- Sealant: Marine-grade sealant (like 3M 4200 or similar) is crucial for waterproofing any holes.
- Drill and Drill Bits: Various sizes for pilot holes and transducer mounting.
- Measuring Tape: For accurate placement.
- Pencil or Marker: For marking drill points.
- Safety Glasses: Always protect your eyes.
- Gloves: To keep your hands clean and protected.
- Screwdriver Set: To match your mounting hardware.
- Fish Finder Display Mounting Bracket: If not integrated into the unit.
- Cable Ties or Wraps: To keep wiring neat and secure.
- Multimeter (Optional but Recommended): To check voltage and continuity.
Choosing the Right Location: Placement Matters
Where you mount your fish finder display and its transducer significantly impacts performance. Think carefully about this step.
Locating Your Fish Finder Display
The display should be easy to see and reach from your usual operating position.
- Visibility: Choose a spot where you can view the screen clearly, even in bright sunlight or at night. Consider glare from the sun.
- Accessibility: You’ll need to be able to adjust settings and operate the unit without stretching or struggling.
- Proximity to Power: The closer it is to your boat’s battery or power distribution panel, the shorter the fish finder power cable run will be, which is generally better.
- Protection: While marine electronics are built to be tough, avoiding constant direct exposure to rain and spray can prolong its life. A console or under a small cover is ideal.
- Mounting Surface: Ensure you have a solid, flat surface to mount the bracket.
Optimal Fish Finder Transducer Placement
This is arguably the most critical part of sonar installation. The transducer needs an unobstructed view of the water below.
-
Hull Type: The best fish finder transducer placement depends on your boat’s hull.
- Planer Hulls: These hulls lift out of the water at speed. The transducer should be mounted on the flat, submerged part of the hull, away from the planing surface.
- Deep-V Hulls: These hulls stay in the water more. The transducer should be mounted on a flat section of the hull, ideally as close to the centerline as possible, and at a depth where it will remain submerged even when the boat is moving.
- Inflatable/RIBs: Often use transom mounts.
- Kayaks/Canoes: May use shoot-thru hull or temporary mounts.
-
Water Flow: The transducer needs to be in clean water, meaning water that flows smoothly over it without turbulence.
- Avoid: Propeller wash, spray from spray chines (steps on the hull that lift water), areas where water breaks or bubbles, and the dead rise (the angled part of the hull near the keel).
- Good Spots: Generally, towards the stern (back) of the boat, on the transom or the hull bottom, in front of any steps or chines, and not directly behind the propeller.
-
Depth: The transducer should be mounted deep enough to stay in the water at cruising speeds. Too shallow, and you’ll lose signal when moving. Too deep, and it might create drag or be vulnerable to damage.
Mounting the Transducer: Step-by-Step
There are two primary methods for mounting a transducer: transom mount and through-hull mount.
Transom Mount Transducer Installation
This is the most common method for smaller boats and kayaks.
Step 1: Prepare the Transom
- Determine Height: With the boat in the water (or simulated if on a trailer), visualize where the transducer needs to be. It should sit about 1/8” to 1/4” below the lowest point of the hull, or level with it. This ensures it stays submerged.
- Mark the Location: Use your transducer mount’s template (if provided) or measure carefully. You want the mount on a flat, vertical surface of the transom. Mark the pilot hole locations.
- Check for Obstructions: Before drilling, look inside the boat (if accessible) or behind the transom to ensure there are no wires, fuel lines, or other components where you plan to drill.
Step 2: Drill Pilot Holes
- Drill Small Pilot Holes: Use a drill bit slightly smaller than the screw threads. Drill pilot holes at your marked locations.
- Apply Sealant: Put a generous amount of marine sealant into each pilot hole. This is crucial for preventing water from entering the hull.
Step 3: Attach the Transducer Mount
- Secure the Mount: Position the transducer mount over the pilot holes and screw it in. Ensure it’s tightened securely.
- Attach the Transducer: Clip or screw the transducer onto its mount according to the manufacturer’s instructions. Adjust the angle so it’s perpendicular to the water’s surface when the boat is level. Some mounts allow for tilt adjustment.
Step 4: Run the Transducer Cable
- Route the Cable: Carefully route the fish finder transducer cable from the transducer towards where your display will be mounted.
- Secure the Cable: Use cable ties to keep the cable neat and prevent it from snagging or dangling. Drill small holes for passing the cable through bulkheads if necessary, and always seal these holes with marine sealant. Ensure the cable has a drip loop near any external entry points to prevent water from running down the cable into your electronics.
Through-Hull Transducer Installation
This method offers a cleaner look and can provide better performance at higher speeds as it’s integrated into the hull. It requires drilling a larger hole.
Step 1: Select the Mounting Location
- Hull Shape: Choose a location on a flat section of the hull, ideally near the centerline. Avoid areas with significant hull dead rise or where water turbulence is high.
- Inside Access: You’ll need access to the inside of the hull to seal the unit and run the cable.
- Depth: Ensure the transducer will be submerged enough at rest and at speed. Check for internal obstructions like stringers or ribs.
Step 2: Drill the Main Hole
- Mark the Center: Using the transducer’s specifications, mark the center of the hole on the hull.
- Drill the Pilot Hole: Start with a small pilot hole from the inside to ensure accurate placement of the larger drill bit.
- Drill the Main Hole: Use the specified hole saw size for your transducer. Drill from the outside of the hull.
Step 3: Prepare the Hole and Transducer
- Clean the Area: Thoroughly clean the area around the hole inside and out.
- Apply Sealant: Apply a generous bead of marine sealant around the flange of the transducer and the hole on the hull.
- Insert the Transducer: Push the transducer into the hole. For transducers with a threaded body, thread it in from the outside. For flanged types, push it through the hole.
Step 4: Secure and Seal
- Inside Mounting: From the inside, place the sealing gasket (if applicable) and the locking nut or securing ring onto the transducer’s threaded body. Tighten firmly but avoid over-tightening, which could crack the hull or damage the transducer.
- Seal Everything: Apply more sealant around the transducer flange on the outside of the hull and around the nut/gasket on the inside to ensure a completely watertight seal.
Step 5: Run the Transducer Cable
- Route the Cable: Route the fish finder transducer cable from the transducer connection point inside the boat to your display location.
- Drill for Cable Entry (if needed): If you need to pass the cable through a bulkhead or deck, drill a suitable hole and seal it meticulously with marine sealant. Install a rubber grommet for a cleaner finish.
- Secure Cable: Use cable ties to keep the wiring tidy and prevent strain on the connections.
Installing the Fish Finder Display
Now that the transducer is in place, let’s get the head unit mounted.
Step 1: Mount the Display Bracket
- Position the Bracket: Hold the mounting bracket in your chosen location. Ensure it’s level and allows for easy viewing and access to controls.
- Mark Holes: Use a pencil to mark the screw hole locations for the bracket.
- Drill Pilot Holes: Drill small pilot holes at your marked spots.
- Secure the Bracket: Use the provided screws or appropriate stainless steel screws to firmly attach the bracket to the mounting surface.
Step 2: Connect the Fish Finder Power Cable and Transducer Cable
This is where fish finder wiring comes into play.
- Connect Transducer: Plug the fish finder transducer cable into the designated port on the back of the fish finder unit. Ensure it clicks securely into place.
- Connect Power: Locate your boat’s 12-volt power source. This is typically a circuit breaker, fuse block, or directly to the battery (with an in-line fuse).
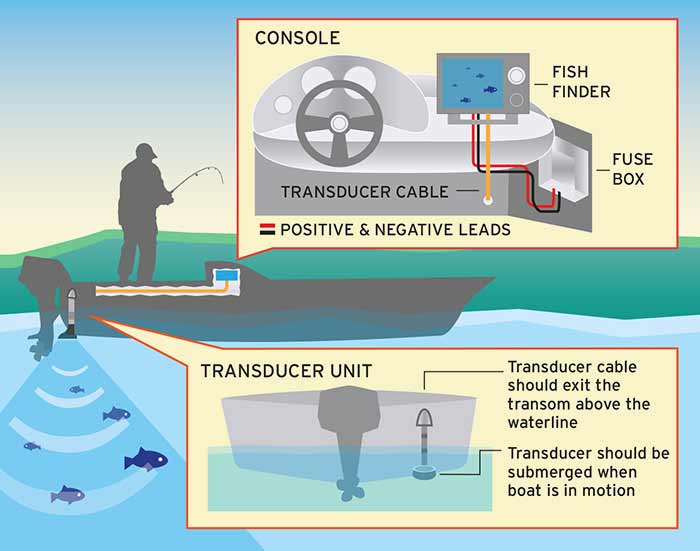
- Identify Wires: The fish finder power cable usually has a red wire (positive) and a black wire (negative). Some units may have a blue or yellow wire for features like NMEA data or ignition sense. Consult your fish finder’s manual for specific wire functions.
- Connect to Power:
- Red Wire: Connect to a switched 12V source (e.g., ignition circuit) so the fish finder turns on and off with your boat’s engine, or directly to the battery positive terminal via an in-line fuse. Using a switched source is generally preferred to prevent the unit from draining the battery when the engine is off.
- Black Wire: Connect to the boat’s common ground (negative battery terminal or ground bus bar).
- Use Proper Connectors: Use heat-shrink connectors for a secure, waterproof connection. Crimp them tightly.
- Install Fuse: If connecting directly to the battery or an unfused circuit, install an appropriate in-line fuse holder as close to the power source as possible. The fuse size should be specified in your fish finder’s manual.
Step 3: Mount the Fish Finder Display
- Attach the Unit: Slide or clip the fish finder display unit onto the mounted bracket. Follow the manufacturer’s instructions for this step.
- Secure the Unit: Most units have a locking mechanism or screws to keep them firmly attached to the bracket, preventing them from vibrating loose.
Step 4: Organize Wiring
- Neaten Up: Use cable ties or Velcro straps to bundle and secure all the wiring. Ensure cables are routed away from moving parts, heat sources, and sharp edges.
- Drip Loops: Create drip loops where cables enter the console or pass through bulkheads to prevent water from traveling along the wires.
- Strain Relief: Make sure there’s no tension on the cable connections.
Testing Your Fish Finder
Once everything is installed, it’s time for the moment of truth.
- Power On: Turn on your boat’s power and then power up your fish finder.
- Check Display: Ensure the display is working correctly and shows no error messages.
- Transducer Signal: The unit should recognize the transducer. Check the depth reading. If you are out of the water, it should show an error or a very deep reading.
- Test in Water: The best test is to take your boat out on the water.
- Check Depth: Ensure you get an accurate depth reading.
- Look for Fish Icons: See if the sonar is displaying fish arches or icons.
- Adjust Settings: Familiarize yourself with the unit’s settings (gain, sensitivity, noise filter, etc.) and adjust them for the best possible performance in your specific water conditions. The goal is to get a clear picture of the bottom and any underwater structure or fish.
Maintaining Your Fish Finder
Proper maintenance ensures your fish finder continues to perform well for years.
- Clean Regularly: Wipe down the screen and transducer with a soft, damp cloth. Avoid abrasive cleaners.
- Check Seals: Periodically inspect the sealant around the transducer mount, especially after rough weather or if you notice any leaks. Reapply sealant as needed.
- Inspect Wiring: Check for any signs of wear or damage to the fish finder wiring and connections. Ensure everything remains tight and secure.
- Protect from Elements: When not in use, cover the unit to protect it from UV rays and harsh weather.
Common Issues and Troubleshooting
- No Depth Reading:
- Check all cable connections, especially at the transducer and the display.
- Ensure the transducer is submerged in water.
- Verify the transducer cable isn’t damaged.
- Make sure the correct transducer type is selected in the fish finder’s settings.
- Faint or Inaccurate Readings:
- Adjust the gain/sensitivity settings. Too low will be faint; too high can cause noise.
- Check fish finder transducer placement. Turbulence or incorrect angle can affect performance.
- Ensure the transducer is clean and free of marine growth.
- Interference:
- Check for electrical interference from other equipment (e.g., radio, motor). Try to route cables away from them.
- Ensure proper grounding of the fish finder.
Frequently Asked Questions (FAQ)
Q1: Do I need to drill holes in my boat to install a fish finder?
A1: For a transom mount transducer, you will need to drill small pilot holes for the mounting screws. For a through-hull transducer installation, you will need to drill a larger hole through the hull. Some kayak anglers use temporary mounts or shoot-thru-hull methods that may avoid drilling, but dedicated installations often do.
Q2: Can I mount the transducer on my boat trailer?
A2: While some people try this, it’s generally not recommended. The transducer needs to be in the water to function. Mounting it on a trailer only allows you to get readings when the boat is being launched or retrieved, not while fishing.
Q3: What is the best way to seal holes drilled in my boat?
A3: Always use a high-quality marine-grade sealant like 3M 4200 or similar. Apply it generously into pilot holes before inserting screws for transom mounts, and around the transducer flange and mounting area for through-hull installations.
Q4: How do I connect the fish finder power cable to my boat’s battery?
A4: Connect the red (positive) wire to a 12V power source, ideally through a fuse and a switch. Connect the black (negative) wire to the boat’s ground. Always consult your fish finder’s manual for specific wiring instructions.
Q5: Will my fish finder work at high speeds?
A5: Most transducers are designed to work at cruising speeds. Performance can vary, and at very high speeds, the transducer might lift out of the water, causing a loss of signal. A properly installed through-hull transducer or a recessed transducer typically performs better at speed than a transom mount.
Q6: What’s the difference between a transom mount and a through-hull transducer?
A6: A transom mount transducer installation involves mounting the transducer on the outside of the boat’s transom (rear). A through-hull transducer installation means the transducer is installed through a hole in the hull, offering a cleaner look and potentially better performance.
Q7: How deep should the transducer be mounted?
A7: The transducer should be mounted low enough to remain submerged in clean, undisturbed water at all operating speeds. Generally, it should be just below the lowest point of the hull or level with it, ensuring it’s always in the water.
By following these detailed steps, you can confidently install your fish finder and enhance your time on the water with valuable underwater information. Happy fishing!